
Amazon recently launched the AWS Snowcone, a new device to its Snow Family called .
AWS Snowcone is the latest released device and it’s a 4.5 pounds (2.1 kg) ruggedized 8 TB disk and 2 or 3 vCPUs (depends on your job) and 4 GB of memory.
According to Amazon the device is tamper-evident and tamper-resistant, data is encrypted at rest and in transit using keys managed by AWS Key Management Service (KMS), which are not stored in the device.
Snowcone comes with an E Ink shipping label to make sure it is sent to the correct AWS facility. The device has 2 RJ45 ethernet ports capable of 1 Gb or 10 Gb networks, supports gigabit WI-FI (option wasn’t available when I ordered) and it’s powered by USB C. It doesn’t come with ethernet cable or power cord, so make sure you have some ready before receiving yours. You can find the list of power supplies here.
I personally went with the Lenovo USB-C 65W. I also tested with a generic 60W USB-C power adapter and it worked, but I recommend you use the recommended option. =)
I ordered a Snowcone to transfer files from my computer at home to S3, but you can use it for edge computing, IoT, logistics and many more. I plan to order more in the future for further testing, but for today we will just transfer some data into it and test the performance.
Ordering a Snowcone can be done via AWS console. Go to AWS Snow Family and create a job. As you can see in the image below I already have a job created.

I am importing data into S3, so select Import into Amazon S3 and click Next.

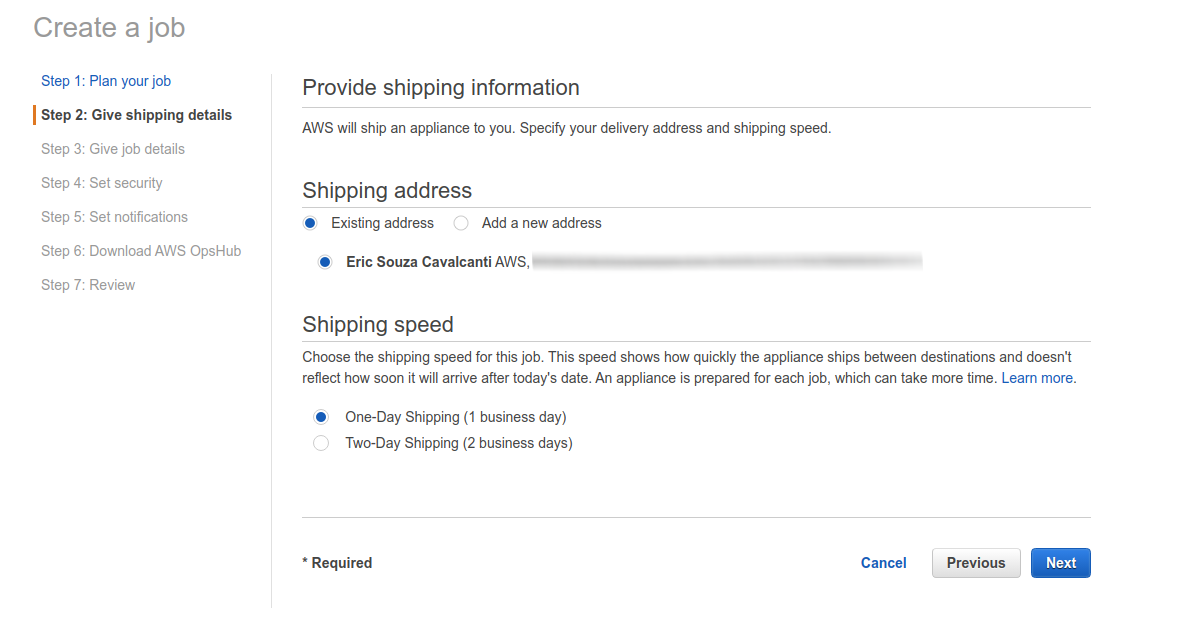
I select my address, if you don’t have one you can add one now, and a shipping speed.
In the next step I named my job cloudtutorialsnowcone, selected Snowcone as device type, I acknowledged that I will provide my own power supply and select my S3 bucket name where data will be imported. I didn’t have the Wi-Fi enabled and I am not testing EC2 on the device, so I didn’t select compute instances.

On step 4 I selected my IAM role, which is easy to create by following the steps provided to you in a new page when you click Create/Select IAM role. I also selected the KMS key and in my case I am using the default because I don’t have any sensitive data.

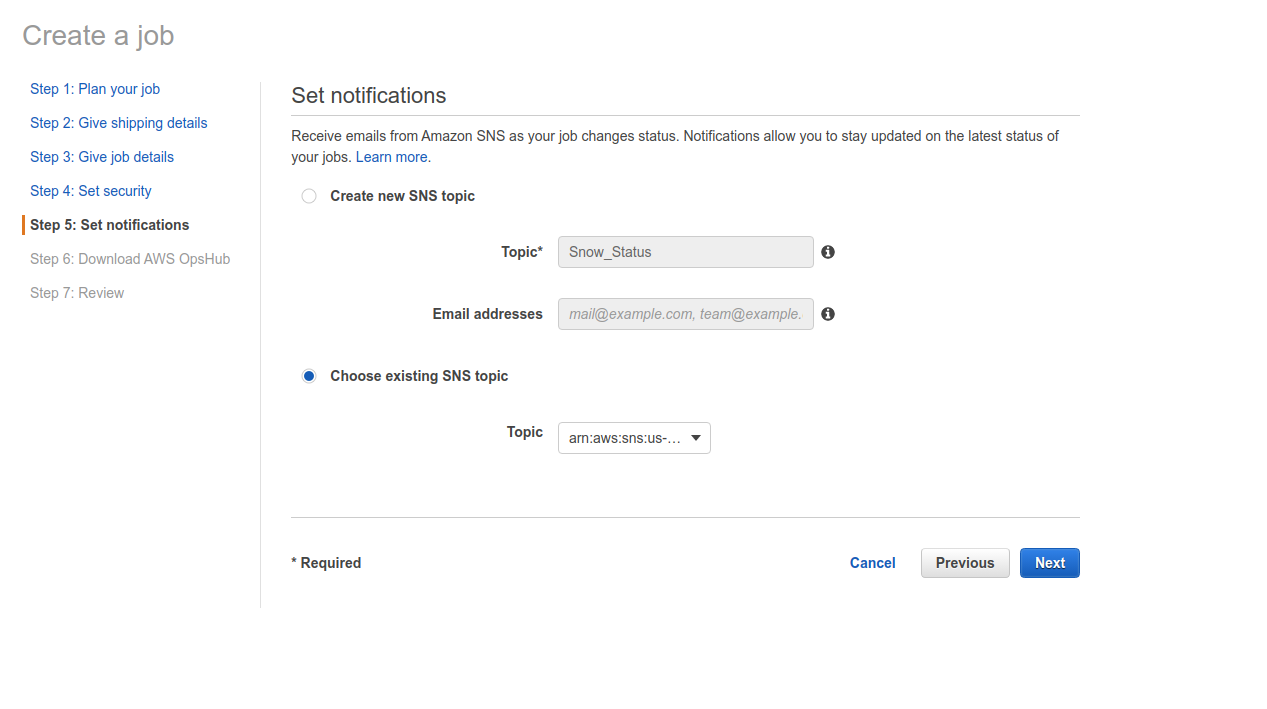
If you would like to receive notifications about the status of your order you can configure on step 5. I already have a SNS topic with my email, so I selected it. You can create a new SNS topic in this step.
On step 6 you can download AWS OpsHub, which is a GUI based management tool. If you are using Windows or Mac, I recommend using OpsHub, unless you rather using CLI. For Linux you must use CLI as of the time I wrote this blog post.
On step 7 you review your job order and if it all looks good click Create job. It may take a few days before you actually get yours. I ordered mine on 06/23/2020 and received on 06/26/2020 and ordered with 1 day shipping. But I have seen some people waiting at least a week to get one.
After some wait, I finally received the Snowcone device and yes, it doesn’t come in a box. It comes as you see in the picture below.
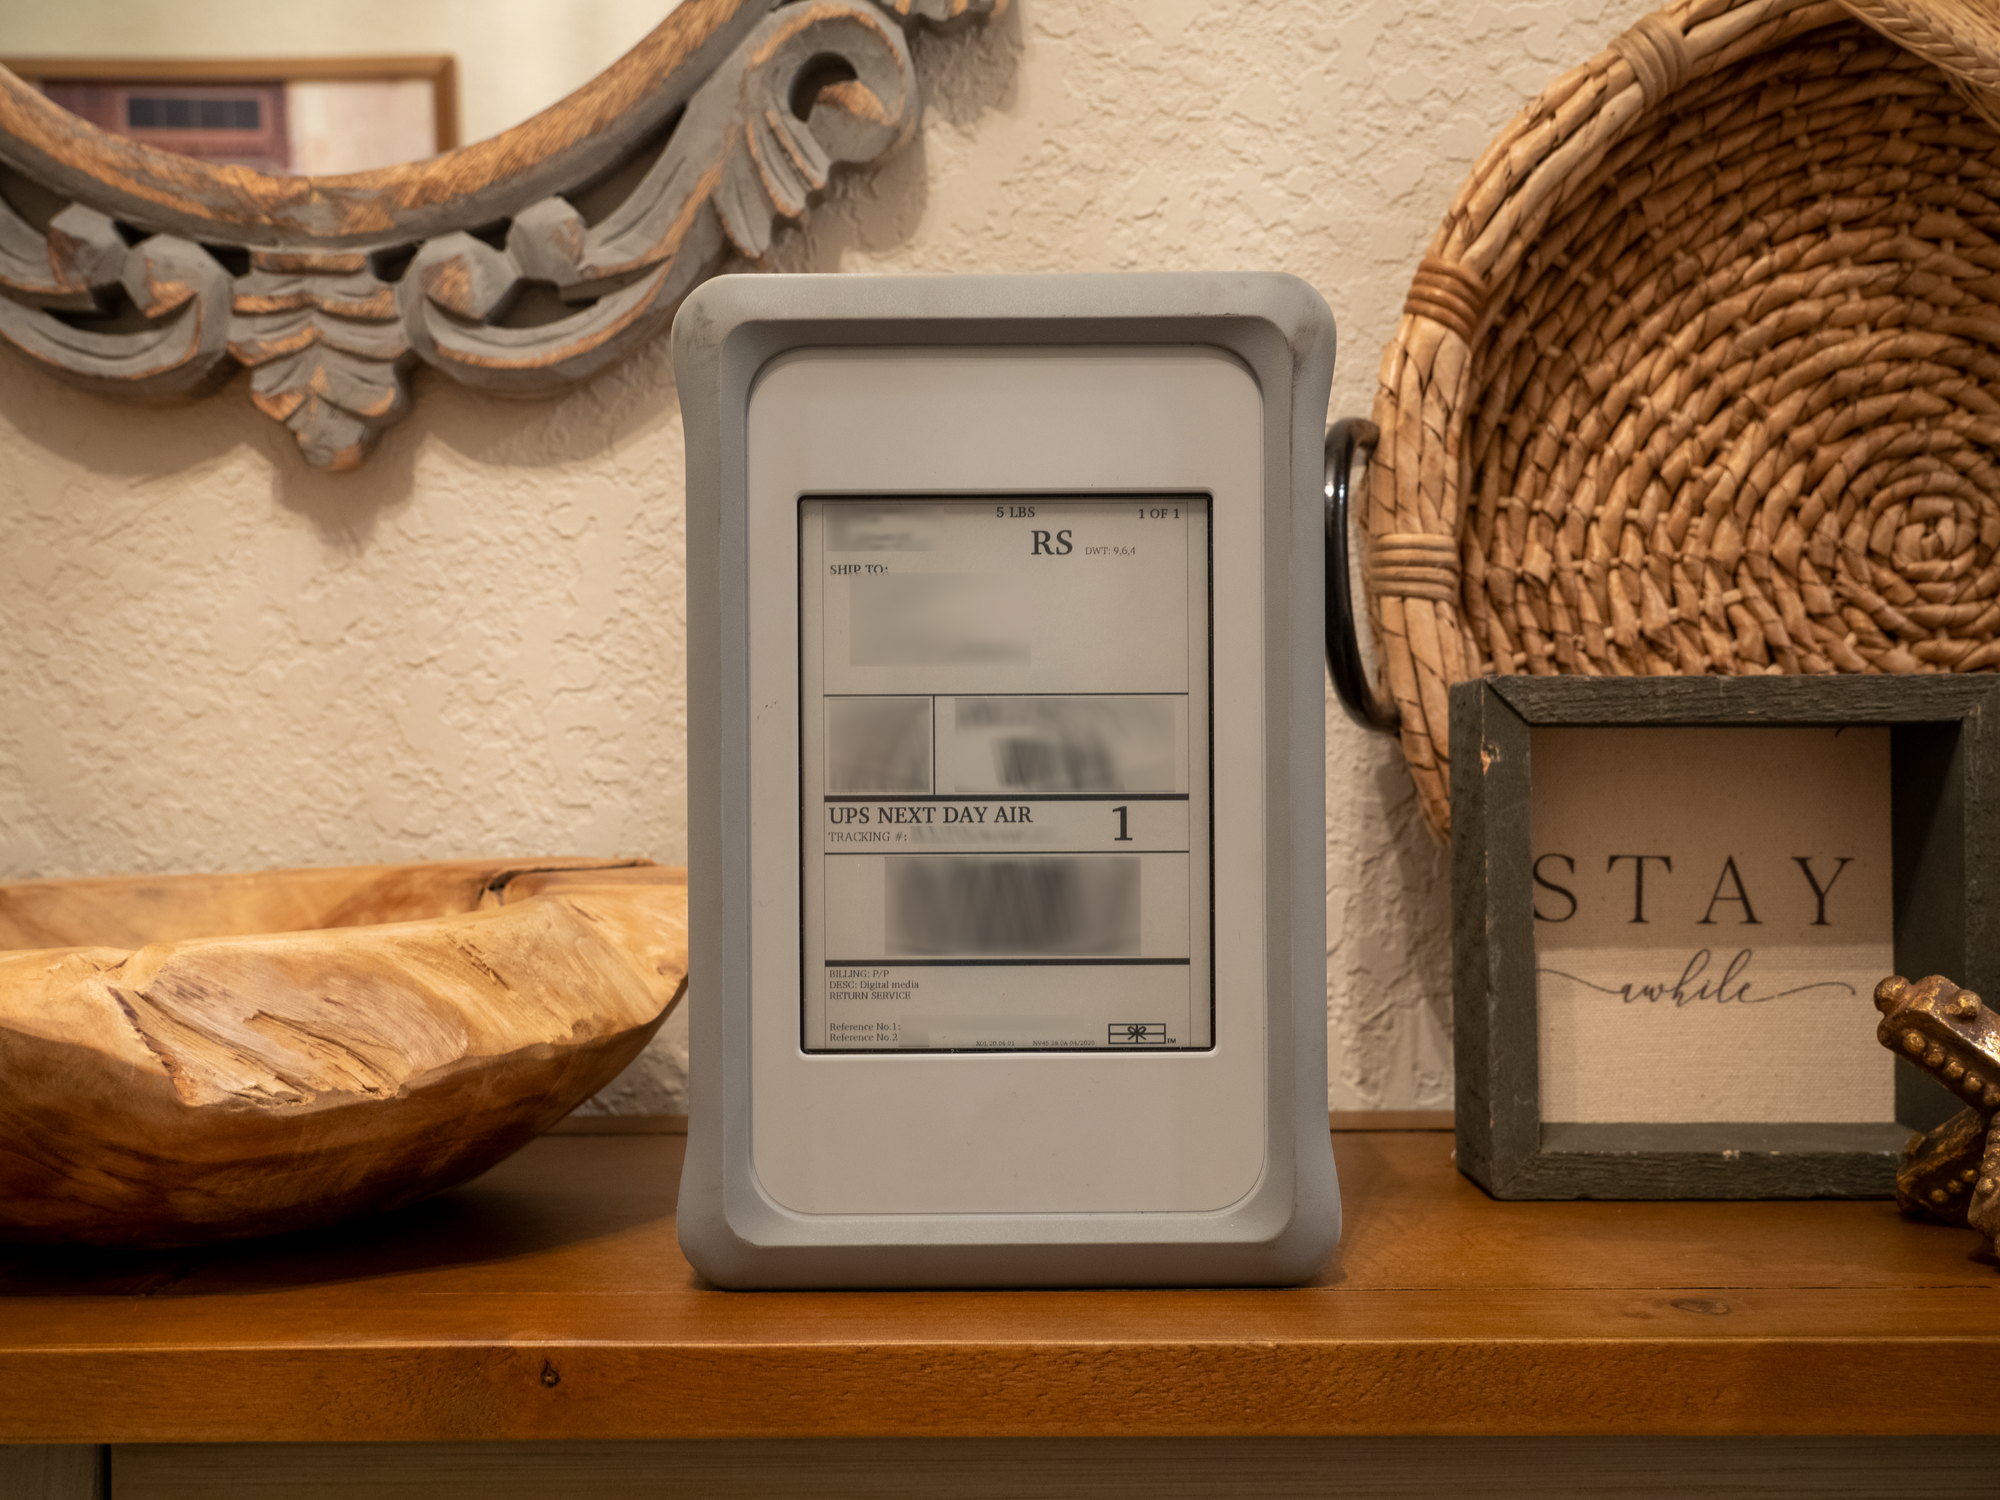
As soon as you receive your Snowcone make sure you look for any damage in the device or visible signs that it has been opened. If anything looks suspicious, contact AWS support right away.
The device comes with 2 NPCs, which are used to validate that you got the right Snowcone. Download the app AWS Snow Family Verification app on Android or iOS.
In this blog post we will go over how to unlock and use the device using the Snowball Edge Client (CLI) on Ubuntu and also AWS OpsHub on Windows. If you are using a MAC, you can follow either one.
Snowball Edge Client
The first thing you have to do is install and configure the Snowball Edge Client. I downloaded the cliented and unzipped on my Desktop to make it easier.
You can find details on how to install the client on Windows or MacOS: Download Here.
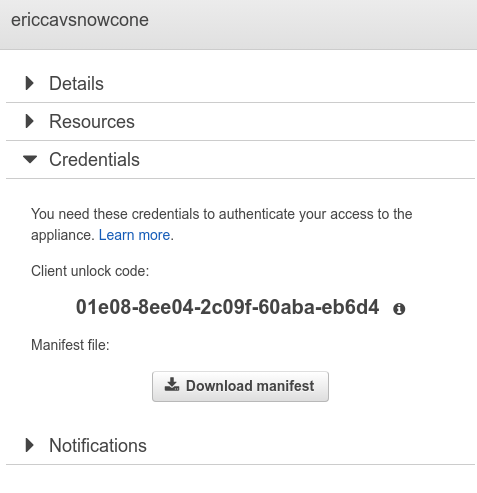
Once you have the Snowball Edge Client, go to AWS console and open the job for your Snowcone and click on Get credentials. You will see an unlock code and download the manifest to a safe place on your computer.
Connect the Snowcone to your network and the power supply and turn it on. It takes a few seconds to initialize, but once it does you will see a message saying it’s Locked and also contain IP address information.

If the IP address is not accessible, you can click on Network and make changes. For me, the IP address assigned by the DHCP server on my network is good.
For the next steps you can find the full explanation and more on AWS documentation.
Now open the folder where you installed the Snowball Edge Client and go to the bin folder, in my case:
~/Desktop/snowball-client-linux-1.0.1-363/bin
Configure the client with the manifest and credentials provided in the AWS console by running:
./snowballEdge configure
You will need to provide the manifest path that you downloaded from AWS console, the unlock code also provided in the AWS console and the endpoint for the Snowcone visible in the screen. For the endpoint make sure you add with https://.
1
2
3
4
5
cajuclc@Ubuntu-newpc:~/Desktop/snowball-client-linux-1.0.1-363/bin$ ./snowballEdge configure
Configuration will stored at /home/cajuclc/.aws/snowball/config/snowball-edge.config
Snowball Edge Manifest Path [JID14ab1358-80e1-40a4-88b8-83ef1939f98d]: /home/cajuclc/CloudTutorial/JID14ab1358-80e1-40a4-88b8-83ef1939f98d_manifest.bin
Unlock Code [*****-*****-*****-*****-eb6d4]: 01e08-8ee04-2c09f-60aba-eb6d4
Default Endpoint [https://192.168.86.120]: https://192.168.86.120

Before configuring NFS and moving our data in, let’s confirm this is the right device we were supposed to receive. We will generate a QR code, which can be used with the AWS Snow Family Verification app to confirm we have the right device. You need a phone with NFC. To generate the QR code, run the command below.
./snowballEdge get-app-qr-code --output-file ~/downloads/snowball-qr-code.png
1
2
cajuclc@Ubuntu-newpc:~/Desktop/snowball-client-linux-1.0.1-363/bin$ ./snowballEdge get-app-qr-code --output-file ~/CloudTutorial/qrcode.png
QR code is saved to /home/cajuclc/CloudTutorial/qrcode.png

Open the QR code saved on your computer and open the AWS Snow Family Verification app on your phone and scan the QR code.
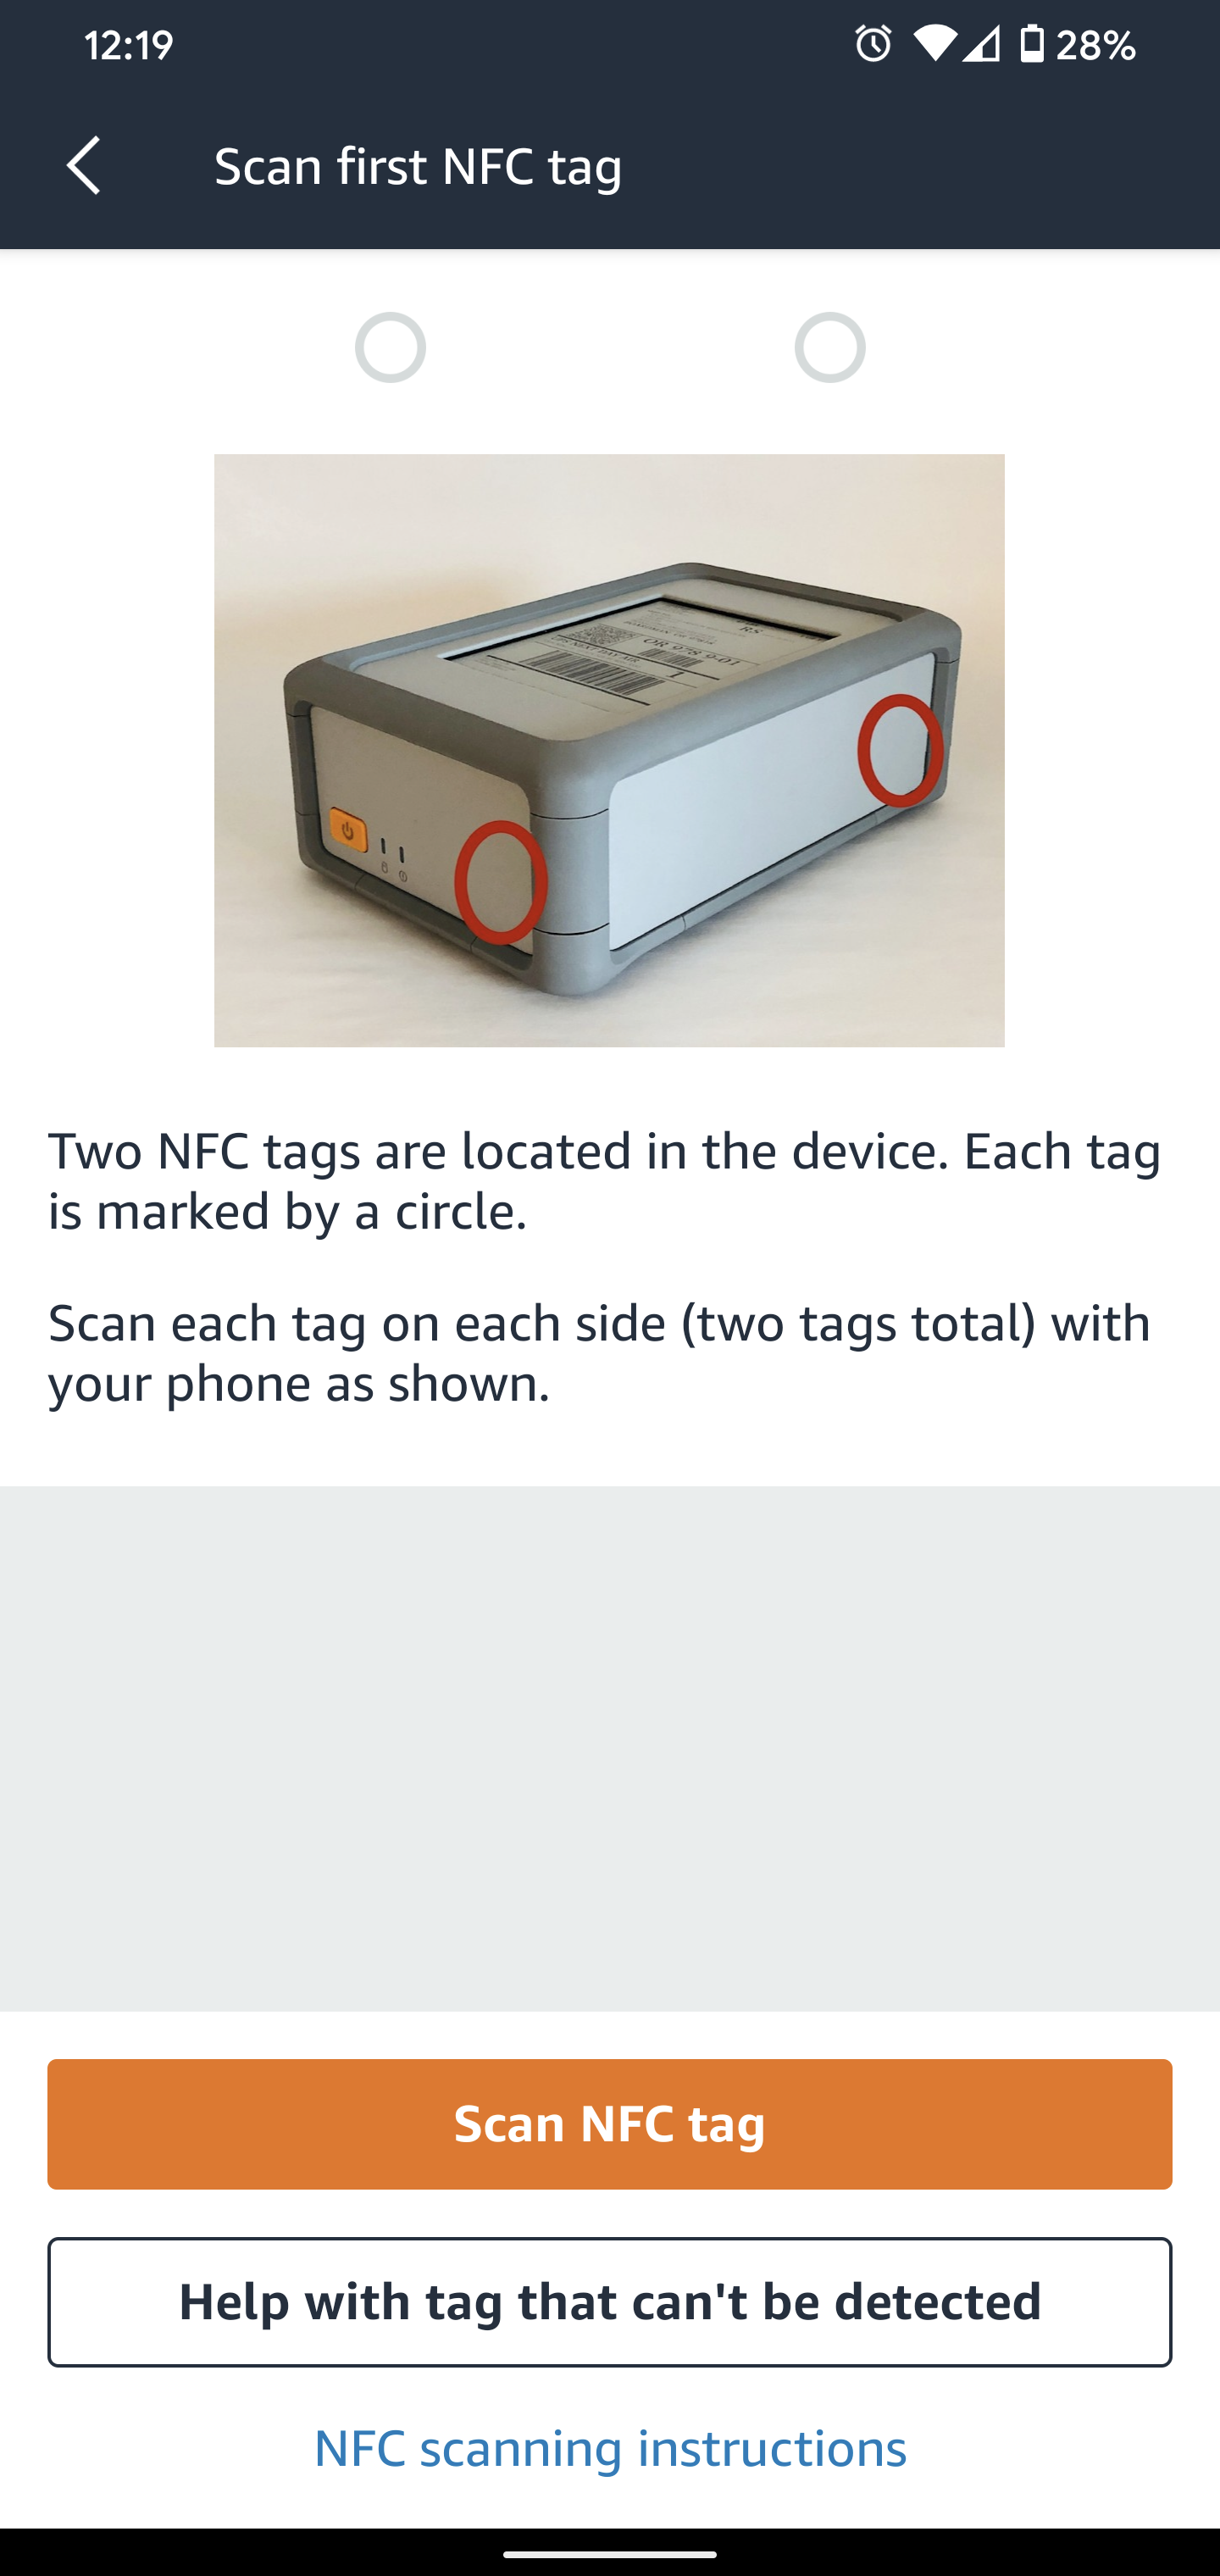
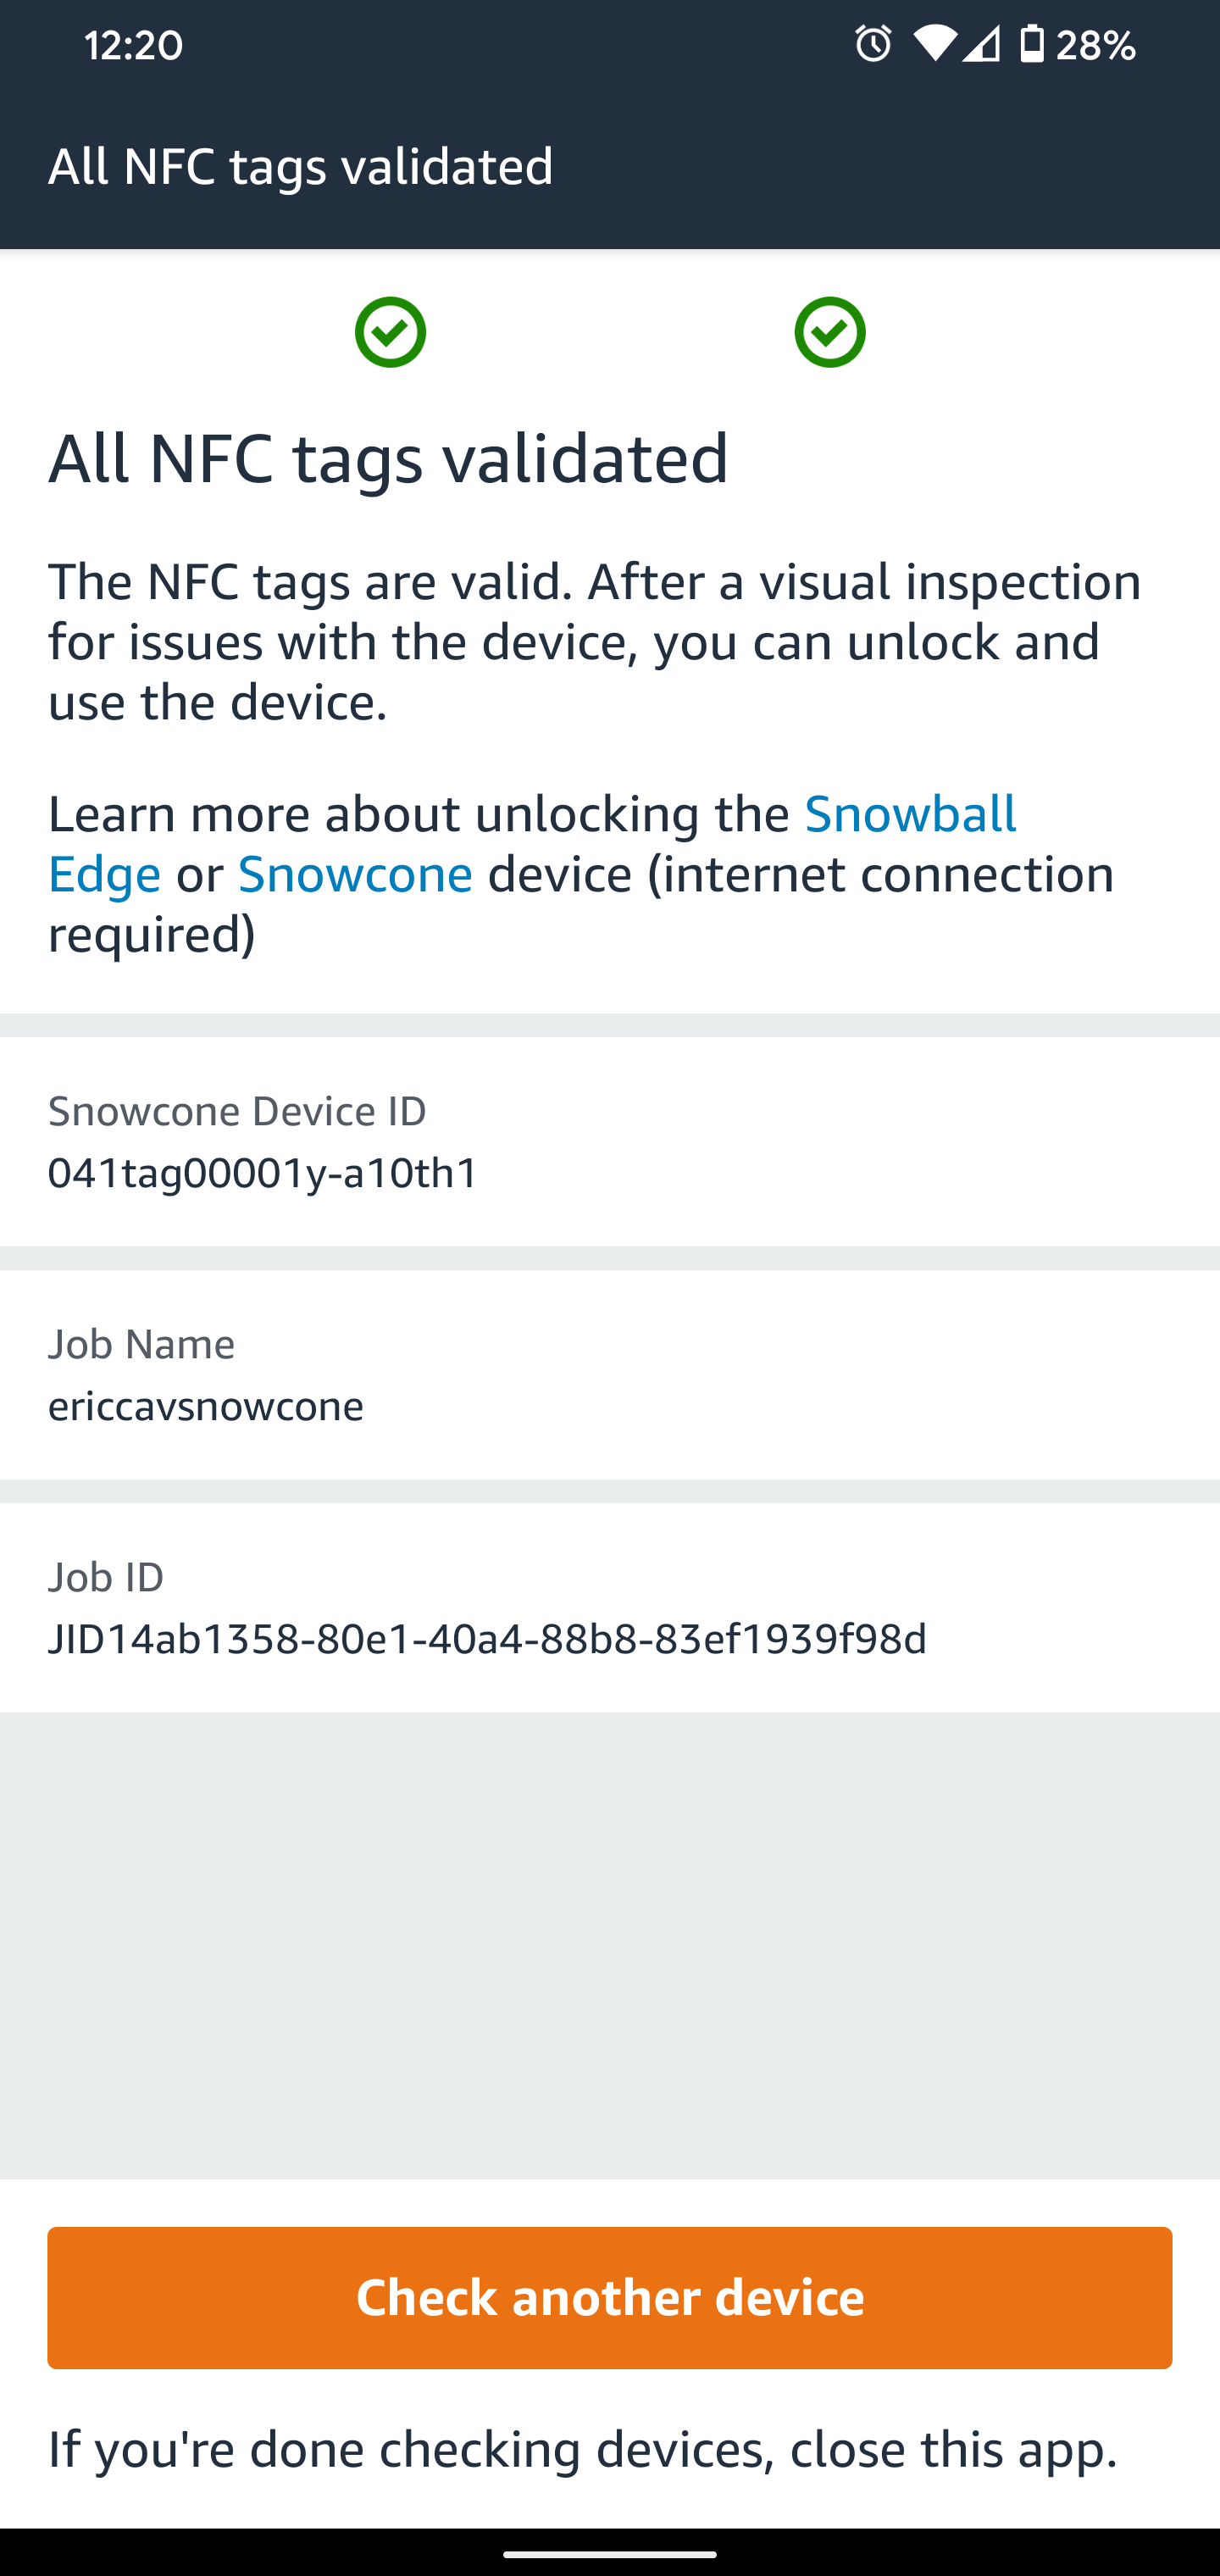
Next step will ask you to scan the barcode on the bottom of the Snowcone, close to the power button. Make sure you have enough light as it can be tricky. Now you will scan both NFC tags by getting your phone close to the locations shown on the phone app. Once you scan both NFC tags, it will validate the tags.
Now that we made sure there is no physical damage and that the device is validated we can unlock it. Run the command below to unlock the Snowcone.
./snowballEdge unlock-device
As soon as you run the command it will output that the device is unlocking, the display will also show as Locked until it has fully unlocked. You can check the status by running the command below.
./snowballEdge describe-device
1
2
3
4
5
6
7
8
9
cajuclc@Ubuntu-newpc:~/Desktop/snowball-client-linux-1.0.1-363/bin$ ./snowballEdge unlock-device
Your Snowball Edge device is unlocking. You may determine the unlock state of your device using the describe-device command. Your Snowball Edge device will be available for use when it is in the UNLOCKED state.
cajuclc@Ubuntu-newpc:~/Desktop/snowball-client-linux-1.0.1-363/bin$ ./snowballEdge describe-device
{
  "DeviceId" : "JID14ab1358-80e1-40a4-88b8-83ef1939f98d",
  "UnlockStatus" : {
    "State" : "UNLOCKING"
  }
}

When the device is unlocked, the describe command will give us some information.
1
2
3
4
5
6
7
8
9
10
11
12
13
14
15
16
17
18
19
20
21
22
23
24
25
26
27
28
29
30
31
32
33
34
35
36
37
38
39
40
41
42
43
44
45
46
47
48
49
50
51
52
53
54
cajuclc@Ubuntu-newpc:~/Desktop/snowball-client-linux-1.0.1-363/bin$ ./snowballEdge describe-device
{
  "DeviceId" : "JID14ab1358-80e1-40a4-88b8-83ef1939f98d",
  "UnlockStatus" : {
    "State" : "UNLOCKED"
  },
  "ActiveNetworkInterface" : {
    "IpAddress" : "192.168.86.120"
  },
  "PhysicalNetworkInterfaces" : [ {
    "PhysicalNetworkInterfaceId" : "s.ni-843cd5ee5c66cdb80",
    "PhysicalConnectorType" : "RJ45",
    "IpAddressAssignment" : "DHCP",
    "IpAddress" : "192.168.86.120",
    "Netmask" : "255.255.255.0",
    "DefaultGateway" : "192.168.86.1",
    "MacAddress" : "60:02:92:8f:db:2e"
  }, {
    "PhysicalNetworkInterfaceId" : "s.ni-8887d8e0ab210376c",
    "PhysicalConnectorType" : "RJ45",
    "IpAddressAssignment" : "STATIC",
    "IpAddress" : "0.0.0.0",
    "Netmask" : "0.0.0.0",
    "DefaultGateway" : "192.168.86.1",
    "MacAddress" : "60:02:92:8f:db:2f"
  } ],
  "DeviceCapacities" : [ {
    "Name" : "HDD Storage",
    "Unit" : "Byte",
    "Total" : 159849623552,
    "Available" : 157702139904
  }, {
    "Name" : "SSD Storage",
    "Unit" : "Byte",
    "Total" : 0,
    "Available" : 0
  }, {
    "Name" : "vCPU",
    "Unit" : "Number",
    "Total" : 3,
    "Available" : 2
  }, {
    "Name" : "Memory",
    "Unit" : "Byte",
    "Total" : 5368709120,
    "Available" : 4294967296
  }, {
    "Name" : "GPU",
    "Unit" : "Number",
    "Total" : 0,
    "Available" : 0
  } ],
  "DeviceType" : "SNC1_HDD"
}
I won’t get into details on how to run EC2, create EBS, get credentials, update, etc as I ordered this Snowcone exclusively to send files to S3. Snowcone comes with NFS, so let’s enable it and restrict access. We need to create a Virtual Network Interface and in order to do that we need to get the Physical Network Interface ID. As I plan on using DHCP IP assignment, I need to identify the DHCP physical interface. We already have that information from the describe-device we used above.
1
2
3
4
5
6
7
8
9
10
"PhysicalNetworkInterfaces" : [ {
    "PhysicalNetworkInterfaceId" : "s.ni-843cd5ee5c66cdb80",
    "PhysicalConnectorType" : "RJ45",
    "IpAddressAssignment" : "DHCP",
    "IpAddress" : "192.168.86.120",
    "Netmask" : "255.255.255.0",
    "DefaultGateway" : "192.168.86.1",
    "MacAddress" : "60:02:92:8f:db:2e"
  },
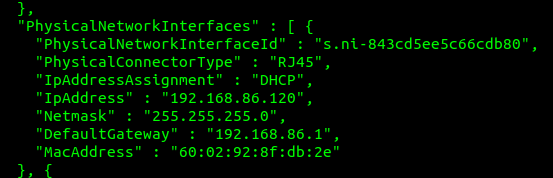
The ID is s.ni-843cd5ee5c66cdb80. Now we can create our Virtual network Interface.
./snowballEdge create-virtual-network-interface --ip-address-assignment DHCP --physical-network-interface-id [physical network interface id]
1
2
3
4
5
6
7
8
9
10
11
12
cajuclc@Ubuntu-newpc:~/Desktop/snowball-client-linux-1.0.1-363/bin$ ./snowballEdge create-virtual-network-interface --ip-address-assignment DHCP --physical-network-interface-id s.ni-843cd5ee5c66cdb80
{
  "VirtualNetworkInterface" : {
    "VirtualNetworkInterfaceArn" : "arn:aws:snowball-device:::interface/s.ni-89fe101c4390d6f52",
    "PhysicalNetworkInterfaceId" : "s.ni-843cd5ee5c66cdb80",
    "IpAddressAssignment" : "DHCP",
    "IpAddress" : "192.168.86.142",
    "Netmask" : "255.255.255.0",
    "DefaultGateway" : "192.168.86.1",
    "MacAddress" : "8e:57:61:d5:78:8f"
  }
}

The new IP address is 192.168.86.142 and we can use to start NFS. We will need the VirtualNetworkInterfaceArn to start the NFS service. I restricted access to the NFS from my computer’s IP only.
./snowballEdge start-service --service-id nfs --virtual-network-interface-arns arn:aws:snowball-device:::interface/s.ni-89fe101c4390d6f52 --service-configuration AllowedHosts=192.168.86.114/32,192.168.5.33/32

1
2
3
4
5
6
7
8
9
10
11
12
cajuclc@Ubuntu-newpc:~/Desktop/snowball-client-linux-1.0.1-363/bin$ ./snowballEdge start-service --service-id nfs --virtual-network-interface-arns arn:aws:snowball-device:::interface/s.ni-89fe101c4390d6f52 --service-configuration AllowedHosts=192.168.86.114/32,192.168.5.33/32
Starting the service on your Snowball Edge. You can determine the status of the service using the describe-service command.
cajuclc@Ubuntu-newpc:~/Desktop/snowball-client-linux-1.0.1-363/bin$ ./snowballEdge describe-service --service-id nfs
{
  "ServiceId" : "nfs",
  "Status" : {
    "State" : "DEACTIVATING"
  },
  "ServiceConfiguration" : {
    "AllowedHosts" : [ "192.168.86.114/32", "192.168.5.33/32" ]
  }
}
If you run the describe command several times, you will see it changes the state several times, so be patient as it can take a few minutes to complete.
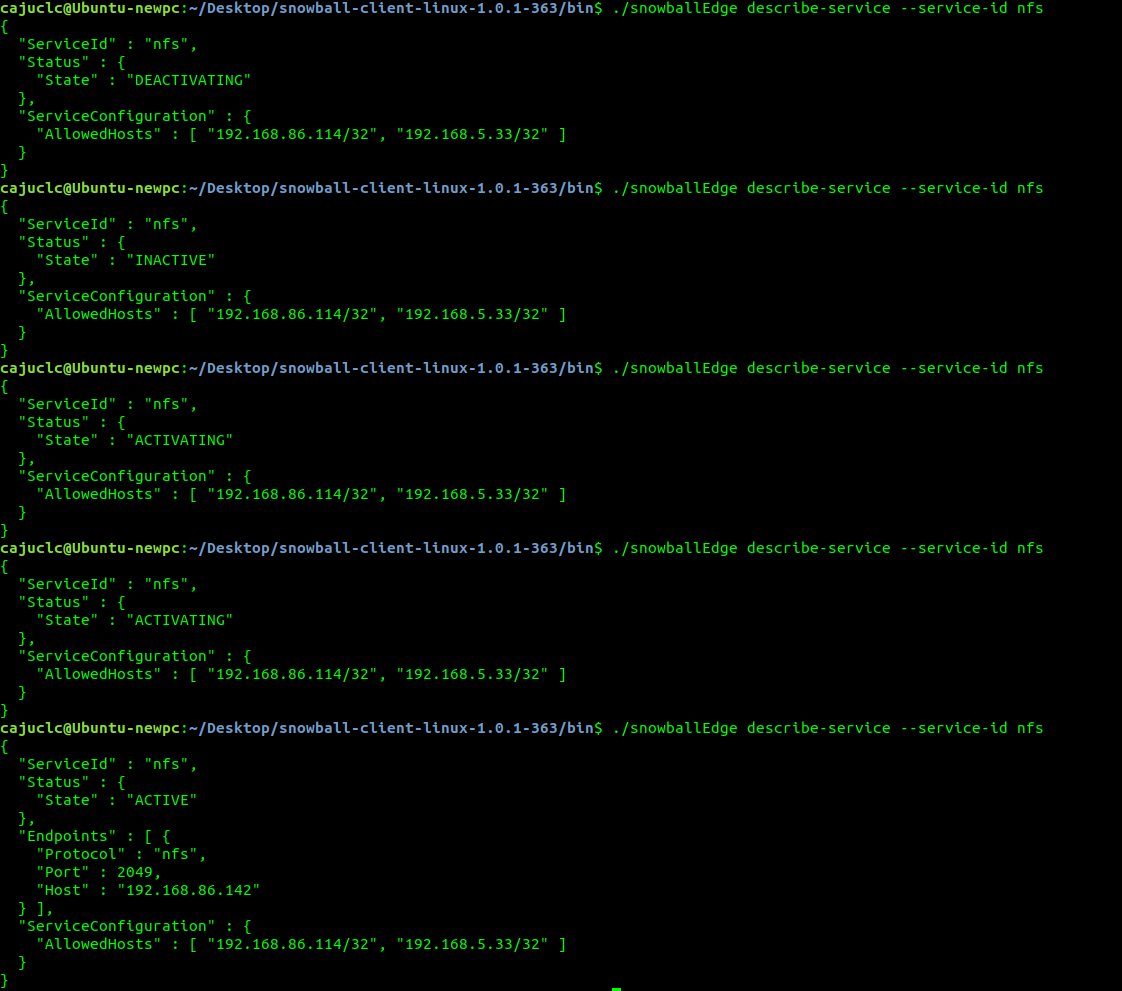
Once NFS is active you will see the Host IP and the allowed IPs configured when we started the service.
1
2
3
4
5
6
7
8
9
10
11
12
13
14
15
cajuclc@Ubuntu-newpc:~/Desktop/snowball-client-linux-1.0.1-363/bin$ ./snowballEdge describe-service --service-id nfs
{
  "ServiceId" : "nfs",
  "Status" : {
    "State" : "ACTIVE"
  },
  "Endpoints" : [ {
    "Protocol" : "nfs",
    "Port" : 2049,
    "Host" : "192.168.86.142"
  } ],
  "ServiceConfiguration" : {
    "AllowedHosts" : [ "192.168.86.114/32", "192.168.5.33/32" ]
  }
}
Make sure you have NFS client installed on your Linux, MacOS or Windows 10. Now you are able to mount the NFS on your local. If you are running Linux or MacOS:
sudo mount -t nfs 192.168.86.142:/buckets/ /media/cajuclc/snowcone
If you are running Windows:
mount \\192.168.86.142\buckets Z:\
You should be able to see the folder mounted now and it should contain the S3 bucket name you used when you created the job for the Snowcone. In my case I used ericcavsnowcone.
1
2
3
4
5
6
7
8
cajuclc@Ubuntu-newpc:/media/cajuclc$ df -h | grep buckets
192.168.86.142:/buckets  7.9T   17M  7.9T   1% /media/cajuclc/snowcone

cajuclc@Ubuntu-newpc:/media/cajuclc/snowcone$ ll
total 20
drwxr-xr-x  1 root    root      30 Jun 24 19:02 ./
drwxr-x---+ 8 cajuclc cajuclc 4096 Jun 30 09:08 ../
drwxrwxrwx  1 root    root       0 Jul  1 21:43 ericcavsnowcone/

Transferring files
I don’t have a 10 Gb home network yet so I decided to run 4 different tests.
- Single 100 GB SQL file with random text. (From Samsung 970 PRO SSD 512GB NVMe).
- 641 random size 4k video files totalling, 861 GB. (From Toshiba X300 5TB).
- 722,555 items, totalling 287 GB. (From Toshiba X300 5TB).
- Transfer 100 GB from Ubuntu and 10 GB from Windows 10 simultaneously.
The first test I transferred the file from a NVMe SSD and I got expected results based on the network. All other tests were from my 5 TB HDD and I also got great performance. I could have achieved better performance if I had a 10 GB network.
I used rsync to transfer the files and output the progress and time it took to complete each transfer. As expected on a NFS mount, you will get better performance when moving large files, so keep that in mind when you are moving smaller files.
| Test | Overall Speed | Time |
|---|---|---|
| Test 1 | 92.46 MB/s | 18 Minutes |
| Test 2 | 20.56 MB/s | 11 Hours 06 Minutes |
| Test 3 | 8.21 MB/s | 9 Hours 15 Minutes |
Test 1
As expected the 1 GB network would be the bottleneck when transferring a single large file from a NVMe SSD to NFS. Transfer was solid for most of the time, but it did drop a few times due to a lot of devices in my house sharing the network. If I had tested on a 10 GB network I would have be limited to the NVMe SSD speeds (3.5 GB/s) and could transfer the file in about 4 minutes.
1
2
rsync -ah --info=progress2 somelargedatabase.sql   /media/cajuclc/snowcone/ericcavsnowcone/test1
        106.53G 100%   92.46MB/s    0:18:18 (xfr#1, to-chk=0/1)
Test 2
The average transfer speed is expected to be slower in our test 2 case. But as we are transferring larger files, rsync won’t be so slow. We are heavily using the network at home while the transfer was happening, from streaming TVs, IoT devices, security cams, phones, laptops, etc.
1
2
rsync -ah --info=progress2 * /media/cajuclc/snowcone/ericcavsnowcone/test2
        861.81G 100%   20.56MB/s   11:06:05 (xfr#640, to-chk=0/641)
Test 3
I also expected the results for our test 3 because of the amount of small files being transferred. Rsync is not the best option to transfer these small files, but I decided to use the same tool across all tests so we can compare them. The transfer took over 9 hours to complete with a smaller size, but a lot more random files.
1
2
rsync -ah --info=progress2 * /media/cajuclc/snowcone/ericcavsnowcone/test4
        286.96G 100%    8.21MB/s    9:15:35 (xfr#534856, to-chk=0/727407)
Test 4
During this test I transferred a single 100 GB file from Ubuntu while transferring a single 10 GB file from Windows, on Wi-Fi, simultaneously.
Ubuntu finished in a little over 23 minutes with speeds ranging 65 - 75 MB/s and Windows finished in 42 minutes with speeds ranging 3 - 5 MB/s.
1
2
rsync -ah --info=progress2 somelargedatabase.sql /media/cajuclc/snowcone/ericcavsnowcone/doubletransfer
        106.53G 100%   71.84MB/s    0:23:34 (xfr#1, to-chk=0/1)
The Windows laptop was connected to one of the mesh routers, which explain the lower speed. I also had to use a free NFS Client as Windows 10 Home doesn’t come with NFS client.
Test 4 was the only test that caught me by surprise, I was expecting the Wi-Fi transfer to be close to the corded speeds. But other than that I think the speeds were as expected.
I noticed some performance drops when I would transfer a lot of files and then delete them. After doing that a few times transfers would be extremely slow in the KB/s speeds. This is explained by AWS FAQ:
Additional note: Snowcone will occasionally perform internal data cleanup tasks after significant I/O operations. During such moments, Snowcone disk performance may seem to be reduced. It is recommended to leave Snowcone with the power on after significant I/O operations are performed, so the cleanup task can finish and normal disk performance is restored.
Just like NFS, the Snowcone performs best when large files are transferred. It is not optimized to transfer several small files as we have seen on test 3. This is due to the process of metadata and encryption. I would recommend compressing smaller files using zip or tar before transferring to Snowcone.
You can also uses the Snowcone to transfer data directly to S3, EFS and FSx for Windows using AWS DataSync. AWS CLI can also be used to spin up EC2 instances on the Snowcone. You have three instance types to pick from:
| Instance Name | CPUs | RAM |
|---|---|---|
| snc1.micro | 1 | 1 GiB |
| snc1.small | 1 | 2 GiB |
| snc1.medium | 2 | 4 GiB |
The fan(s) can also be a little loud when a transfer is going on. My PC has four 120 mm and two 140 mm fans and I can barely hear them comparing to the tiny fan on the Snowcone. But that shouldn’t be a problem on a business environment.
Let me just say that I love everything about this device and the idea behind it. One of the hardest part of moving to the cloud is moving data from on premises to your cloud provider data center, but devices like this make everyone’s life easier. Moving to the cloud can also get expensive and not everyone can or is willing to spend $300 or more on the Snowball Edge. The Snowcone is much cheaper and even with only 8 TB it is most likely enough for many people who need to transfer some data and don’t have the bandwidth necessary to do that.
There are things I would love to see like Wi-Fi (mine didn’t come with it) and more storage options like 16 TB HDD or 8 TB NVMe SSD. A Thunderbolt 3 would also be awesome with those 40 GB/s speeds, but all that can add to the price and I think Amazon went with the best possible options at the moment to deliver an awesome little device to help customers move to the cloud AND keep the costs down.
I hope that this tutorial will help. Please leave your comment on what you would like to see, improvements or if you got a Snowcone tell us what you have done with it. Also please share the blog with others, I really really appreciate it!
Até mais!